Friday, August 31, 2012

10 Reasons to Shoot Portraits During the Golder Hour


Recently I have subscribed to an online Digital Photography School which I found very useful and filled with loads of tips and information for all the photography enthusiasts. I quite like this website/blog and intend to make use of this more as I get time to learn more about this art of digital photography.

In today's email that I received from the subscription, there is one very useful article they have published "10 Reasons to Shoot Portraits During the Golder Hour" 

This illustrates how you can use the 'golden hour' lights to add the magic factor to your photos. Beautiful, isn't it?

I made this reference (post) to that article for my own use and quick reference in future. I hope you benefit from it too.

Happy Learning !!!


Disclaimer: As mentioned in the post above, I have added the link to the original post and blog on my blog only for learning purposes and for future quick reference. It does not intend to take any credit for the work of the writer of the article (or the blog/website where the article was published to)


Thursday, August 23, 2012

Learning the Shutter Value


Shutter Speed is one of the most important setting on a digital camera - in this case I am talking about a DSLR. It is one of the famous trio settings i.e. Aperture, ISO and Shutter.

It is the property of the camera (body) that controls the time duration for which the light enters through the lens onto the sensor. It is represented in seconds or fraction of seconds i.e. 1sec, 1/2sec, 1/4, 1/8 and so on.  Keeping other settings (i.e. Aperture and ISO) unchanged, different shutter speeds can produce different different output images when the object is non-stationary. 

Most of the digital cameras and dslrs have a Shutter Priority (or Tv) mode on it which is used when you want to control the speed of the shutter while your camera controls all other settings based on what shutter speed you choose. A good example of using Shutter Priority mode is when you are shooting kids who are constantly moving/playing and generally do not stay in the same pose for long enough to be captured. Even if they do then most of the pics come out blurry because they like to move just on the last moment when you press the shutter on the camera :-). 

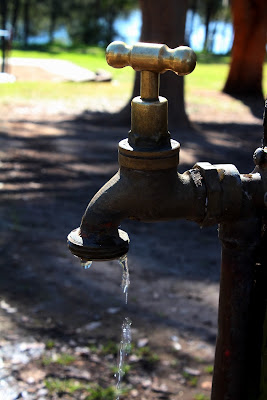
A fast shutter speed freezes the moving object and hence produces a sharper image (based on the shutter speed). Last weekend I tested the same in an attempt to understand and experience how it comes out. Below are three different images that were captured at different Shutter speeds with different output. This may not be good quality photos as I was actually helping a friend to understand the affect of shutter speed therefore just took these rather randomly without much attention to overall composition of the image.


Image 1:

Running water from the Tap:

I deliberately opened the tap only a bit to get an appropriate flow of water as shown here in this image.


Camera has following settings:

Manual Exposure:
Tv (Shutter Speed): 1/50
Av (Aperture Value): f/16
ISO: 400


IMG_1016

Image 2:

Water dripping from the Tap

In this photo, notice the affect of a faster shutter speed on the output. The running water looks like dripping only i.e. the movement of the water was slowed by the faster shutter speed.

Camera has following settings:

Manual Exposure:
Tv (Shutter Speed): 1/320
Av (Aperture Value): f/16
ISO: 2500


IMG_1018

Image 3:

Water leaking from the Tap

Notice the affect of an even faster shutter. It now looks as water drops are being leaked from the lose tap. The fast shutter speed has frozen the movement (of running water) and made it look like a drop of water. Note closely there are at least 3 water drops in this photo.

Camera has following settings:

Manual Exposure:
Tv (Shutter Speed): 1/640
Av (Aperture Value): f/16
ISO: 3200


The ISO settings were different on all these photos as well (just ignore that bit as that is not our topic today). There is lot more for me to learn and try out still and I have different ideas that I want to try with different settings.

I will post more about shutter speed effect in later posts only after when I’ve had tried the different settings/variations of Tv values.

Happy Learning !!!

Friday, August 17, 2012

Fear To Stand before your Lord


وَلِمَنۡ خَافَ مَقَامَ رَبِّهِۦ جَنَّتَانِ (٤٦) 

46) "And for him, who fears to stand before his Lord, are two gardens"

____________________________________________________


The above Ayat (#46) is taken from Surah Ar-Rahman which is surah # 55 in the Holy Quran.

In this verse, Quran tells us the benefits of fearing ALLAH. This means that one day (the day of judgement) we all have to stand before ALLAH when we will be answerable of all what we have done in our lifetime and those who have spent a pious life and have done good deeds will be rewarded with Jannah. And those who have spent their lives in sins and disobeyed their Lord and did not follow the sunnah of HIS messenger Hazrat Muhammad (salillah-ho alaihe wa-aale-hi wassallam) will have to enter the Hell.


In this context Quran says that those, who fear the embarrassment to face their Lord (having done sins) and fear the punishment on the day (i.e. entering Hell) and therefore follow the path that Quran and Ahadith show us, will be rewarded with two garden in the Heavens.


SubhanALLAH ! - and ALLAH knows the best.

In the next verses of the same Surah, the detail of those gardens is also given. I will inshallah write more about that details and description of these gardens in next posts.


Tuesday, August 7, 2012

Exposure - As I Know It.

I have decided to write about what I will be learning about photography and my personal experiences with those learning bits. This is a way for me to understand the techniques better and to use it as a reference point in future (when needed). In the meantime it may also benefit someone like me i.e. an amateur.

Having said that, I have to start with Understanding the Exposure as I believe it is one of the most important aspect of the photography (digital photography in this context if its any different to film). It is therefore the prime objective of any photographer to capture a photo with appropriate exposure i.e. one which is neither too bright nor too dark, in relation to the conditions at that time.

The different modes and controls that are available on a camera are there to enable the camera or the photographer to control the light on the image so that the output has a perfect balance of light and shade. The famous Aperture value (F stop), Shutter speed and/or ISO settings are there to define an ideal combination that will allow adequate amount of light through the lens onto the sensor of the camera in order for it to develop a beautiful image. I say beautiful because that is what an accurately exposed image should look like. As I have noted earlier Playing with Exposure, despite the given rules of shooting in the daylight or in low light, it is ultimately the photographer who is responsible to instruct the camera about how to expose the scene that he is focusing at.

Quoting from my own experience, I suggest to learn the control following way:

Conditions: A Clear Sky Bright Sunny day

Set the ISO to a low number i.e. 100
Set the Aperture value (Av) to say f/8

Now you should play with Shutter Speed (Tv) to control the amount of light passing through the shutter. Start with 1/100 and see how it affects your image then from there you can increase the shutter speed or reduce it to control the light how you want. You should also try with different combination of Av and Tv to find the perfect balance of light and shade on your photos. It is you to decide what combination creates a perfect exposed photo. It is important to change the shutter speed with the changing sun light i.e. if there are clouds that cover the sunlight or there are trees preventing your scene from the direct sunlight, that means you will need to adjust the shutter speed accordingly in order to keep the image properly bright and exposed. When it is slightly overcast, you may need a slow shutter in order to allow enough light onto the sensor to develop the image correctly. Once again it is up to the person how he wants to capture the scene or what settings suits his requirements.

I haven't tried shooting in the dark or in the evening or overcast conditions yet therefore I won't write anything about that for now. Although it is almost the inverse settings when you are shooting in low light but still I want to practice and experience it myself before I can blog about it. Remember I said it is my personal experiences and I don't have one yet.

This much is what I understood Exposure so far, may be right or may be wrong, but I'm looking to improve my understanding of it in the future as time permits me to play more with the camera and then I will be able to write more about it.

Let me know if you agree/disagree or have any suggestion/comment on this post that may help improve my or have helped your understanding of Exposure :-)

Happy Learning !!


Monday, August 6, 2012

Playing with Exposure – Shooting on a bright day


Today I went out for 2nd round of shooting with my Canon 650D and again it was a bright sunny day. But this time I knew (bit more) about how to control exposure when shooting in bright sunlight.

Last time it was also a bright sunny day and many photos were over-exposed when I checked them after transferring to my laptop. Then I did some research and read some articles about shooting under a bright sunlight and that’s why this time I was better prepared to shoot in similar conditions. I loved the control a dslr provides you with. It feels great when you decide how you expose your image to the light or how much light you want the camera to allow to enter through the lens to develop a perfect photo.

Despite the Sunny 16 rule, I found that it is you who decides on the spot that what settings suit the scene that you are trying to capture how your camera settings are actually capturing it. There is no one fixed setting for each scene (the combination of light, object, background, movement etc.) that you want to shoot rather you can achieve the same (or similar) result for the same scene with different combination of settings. For example if Sunny 16 rule states that at an Aperture value of 16, you can shoot with perfect exposure if you set the shutter speed to inverse of the given ISO value i.e. if ISO is set to 100 then your shutter speed should be 1/100 (or close to it). I believe that the same result can be achieved by changing all those values. At least I tried it with different combination of Av, Tv and ISO and I can confirm the photo was perfectly exposed as the output was almost as I saw it through the lens or even without it.

As I said, I believe these rules are there to help you with basic settings/combinations of Aperture/Shutter/ISO but in the end it is up to the photographer that how he uses these settings/combinations to get the best photo out of his camera. (I may be wrong as I’m no expert but this is what seems to be working for me – so far).

Below are few images that I took with different settings that shows how different combination produce an altogether different image. I took all these photos at ISO 100 and camera program was set to Manual Exposure i.e. fully manual mode.

An over-exposed image: Av 8.0 & Tv 1/125

IMG_0678

A properly exposed image: Av 8.0 & Tv 1/320

IMG_0683

Another over-exposed image with Av 8.0 & Tv 1/40

IMG_0618

Same image with slightly different Shutter Speed. Av 8.0 & Tv 1/50

IMG_0622

At an Av of 8.0 and Tv of 1/100, the sky colour is shaded with the bright sunlight and tree branches are not as vivid as it actually were

IMG_0709

Change the Shutter speed and look at the difference below.

IMG_0711


I used to own a point and shoot digital camera earlier (that I still have but not using anymore) but since I’ve bought a dslr, I am extremely happy with the investment as it does give the kind of control that allow you to shoot the image as you see or want. You only have to know how to use the given controls and settings on the camera.

Having said that, I am not claiming that I’ve learned all or have become an expert over-night. All I am saying is, I am very excited to have my new toy and it pays back to spend some time into learning what your ‘toy’ can do for you Smile


Happy Shooting !!!

Saturday, August 4, 2012

Shooting With My New DSLR – Canon 650D


Last weekend I drove to ‘The Weir Reserve’ near Penrith to play with my new toy, Canon 650D. Very excited having bought it and looking forward to use it even more frequently and take more photos. I will be sharing those photos here on my blog as and when I take these and get time to update the blog.

Here are some that I captured last weekend.

Trying to capture a Sun-Star
IMG_0289_1


Some fallen bushes with some kind of beans/berries (don’t know what is it called, any idea?)
IMG_0306_1

Some naked tree branches -
IMG_0307

A two feet tall waterfall (this is actually a crossing of the river – has some history attached to it)
IMG_0333

The two-feet Waterfall (at the river crossing)
IMG_0398_e

Shallow Depth of Field – Check.
IMG_0336_1

A tip-of-the-petal Point Focus
IMG_0337_1

Another close-up with shallow d-o-f
IMG_0366_1

Loved this hanging flowery bush -
IMG_0382_e

That is it for this post – I actually have more that I want to share but will do in next posts.

In the end if anyone, by chance or mistake, happened to come across this post/blog please do leave comments (critique/appreciation) and also share with me your photos or blog where you have posted your art work. I may learn something new out of that and that way you will have one more fan of your work Smile

If there is no such ‘chance’ or you don’t make ‘mistakes’ then I will just continue to post my photos here until someone does a ‘mistake’ – ha ha...

Happy Shooting !!!

Opera House & Harbour View


Taken with my mobile (HTC One X) few weeks back, this is one of my favourite.
Opera House

Buying your first DSLR

When buying your first DSLR, one gets so confused with the range to choose from and it can be tough to find the best combination of the features and functions for the amount that you willing to spend on it.

Another dilemma choosing your first dslr could be the fact that you don't know much about the dslrs and what features and functions it can offer. There are many brands and their many different models with many different features and functions. Choosing from such a vast range of options can be very tricky and needs lot of research to know that you get what you want to for your money. This is why I had done my share of research on the web, ask friends/colleagues who own a DSLR already or who know some about abc of photography for advice and suggestions. Read various blogs, articles, comparisons of the various dslrs,  notes from a colleague and posts about the basics of the photography.

One article that I found very convincing and useful about 'buying a dslr' is the main reason that I write this article. I wanted to save this article for a future reference of my own and increase its instances on the web if someone (like me; a newbie to dslr world) searches for some ideas on how to buy a new dslr. The article is found on the link http://mansurovs.com/dslr-purchase-guide. This helped me make a decision on the model that I ended up buying, a Canon 650D shown in the image above.

The summary of things that one, who is new to dslr photography, has to consider when buying first dslr is

1- When buying first dslr and if you have very little knowledge of photography, then do not spend big money rather go for an entry level dslr. Keep it simple as that will help you learn your camera and photography quickly.

2- An entry level dslr will give you enough control and quality of photos to begin with and once you learn how to use it and how to best use the basic functions Aperture, Shutter, Exposure it will be justified then to invest more on your camera.

3- Either you buy a Canon or a Nikon (not sure about other brands since I wanted to buy only one from these two), both the brands have a large range of lenses and that means you can simply buy more lenses with the same body to try on different/advanced options. Make sure the camera you buy does support those lenses (if you'd have to buy later).

4- If you want to take some really good photos in the dark light with your new dslr, then it is wise to invest in a nice tripod because without one it is hard to take a nice clear photo in the dark.

These are the main points (as far as I have learned so far) but there could be more that one will learn as you grow into dslr photography.

In short, suggest to research appropriately before buying your first dslr and it is important to do that since you don't want to regret later since a dslr does not come cheap.

Happy buying your first DSLR !!

It is exciting :-)

Thursday, August 2, 2012

The Wisdom Behind Fasting and Its Benefits

Below is a very nice article on the "wisdom behind fasting and its benefits" that I came across on a blog www.muftisays.com. I liked it and thought to keep it for my future reference therefore I am copying it here on my blog (with full reference to the source).

There are innumerable reasons and benefits of fasting. One of the most promenent is habituating oneself with controlling the carnal self. One thereby restrains one's innate desires, as a result of which those good deeds that are normally difficult to carry out become easier. One therefore is able to forsake sin and develops the qualities of piety and abstinence.

Allah سبحانه و تعالى says, "O you who have Imaan! Fasting has been made obligatory for you just as it was made obligatory for those before you (the Jews and Christians), so that you may develop Taqwa (fasting saves a person from sin because it develops self-restraint and drives away the passions that lead to sin.) - Surah Baqara 2:183

Fasting serves as a nutrition for the soul so that the soul gains strength by it. There is nothing as effective as fasting to curb carnal desires and purify the soul. Fasting opens the door to spirituality and lends vitality to one's acts of worship.
 
Reliable books of Ahadith mention that Rasulullah صلى الله عليه وسلم once asked, "O Allah! What brings a person closest to You?" Allah سبحانه و تعالى replied, "When a person is hungry and in Sajdah."

Another wisdom behind fasting is that people inculcate the qualities of Allah. Just as Allah سبحانه و تعالى does not need food, drink or carnal passions, the fasting person also does away with these during the fast. Similarly, he also then adopts the qualities of the angels عليهم الصلاة والسلام who are sustained on Dhikr and not on food. The fasting person also gets the golden opportunity to be grateful to Allah during the days of fasting, when he also sympathizes with the poor.

Furthermore, fasting purges the body of toxins and diseases and is especially effective in purging phlegm. Fasting harnesses the love of Allah سبحانه و تعالى and Rasulullah صلى الله عليه وسلم and raises a person's stages in the Aakhirah (Hereafter).

Allah سبحانه و تعالى says, "Fasting is for Me and I shall personally reward a person for it." - [Hujjatullah al-Baaligha Vol.1 pg 154]

Another of the thousands of reasons for fasting is that by fasting, a person is fulfilling the command of Allah سبحانه و تعالى, thereby gaining proximity to Him.

And Allah knows best what is most correct.

[Fatawa Rahimiyyah Vol.3 pg 118-119]

by: Mufti Abdur Raheem Lajpuri  رحمه الله


Original Post can is posted here:
http://www.muftisays.com/blog/Seifeddine-M/2976_01-08-2012/the-wisdom-behind-fasting-and-its-benefits.html